Generating an image from a dynamic piece of multiline text in Golang
I recently needed to be able to take a dynamic text string of arbitrary length and turn it into a fully rendered image that could be saved to GCS. I found plenty of examples of code that showed how to import your own font file, generate a basic image with whatever background color you desired and then draw the text string on top. What I couldn’t find were details on how to handle drawing that string if it was too long or needed to be multiline. Most of the examples assume your string is a constant or already formatted into the lines you would be drawing. Cue needing to do some math around the width of your string, how to break it up and determining the number of lines your text will be rendered into to help handle positioning and centering.
Importing and Using Your Font Face
The first step in being able to generate this final image of the text is to first import the .ttf font file you want to draw your text in. This is needed because we want to utilize the builtin font.MeasureString method from https://pkg.go.dev/golang.org/x/image/font which provides an interface for font faces. The MeasureString method returns the distance a dot would travel when drawing the designated string with the specified font face. There are additional configuration details that need to be setup for the font like the size, dots per inch, hinting, etc. These can all affect the width of the text strings that will be drawn.
// load font file and typeface
fontBytes, err := ioutil.ReadFile(<PATH_TO_FONT_.TTF_FILE>)
f, err := truetype.Parse(fontBytes)opts := truetype.Options{}
opts.Size = FONT_SIZE
face := truetype.NewFace(f, &opts)// sampling of some of the options that are set
fg, bg := image.White, image.Black
rgba := image.NewRGBA(image.Rect(0, 0, IMAGE_WIDTH, IMAGE_HEIGHT))
draw.Draw(rgba, rgba.Bounds(), bg, image.ZP, draw.Src)
c := freetype.NewContext()
c.SetFont(f)
c.SetClip(rgba.Bounds())
c.SetDst(rgba)
c.SetSrc(fg)
Determining single-line vs multi-line
We need to first figure out if the string can be rendered fully in a single line or if it’s going to exceed our desired dimensions. This is fairly straightforward- just check if the total textWidth exceeds your threshold for the image width. If not, then you can draw the string in one line and all you need to do is determine the proper point to place the text.
// Single-line case// calculate full length of string
textWidth := font.MeasureString(face, text).Ceil()
textHeight := face.Metrics().Ascent.Ceil() + face.Metrics().Descent.Ceil()// to center text in your image
x := (IMAGE_WIDTH - textWidth)/2
y := (IMAGE_HEIGHT - textHeight)/2
pt := freetype.Pt(x, y)// draw the string
_, err = c.DrawString(text, pt)

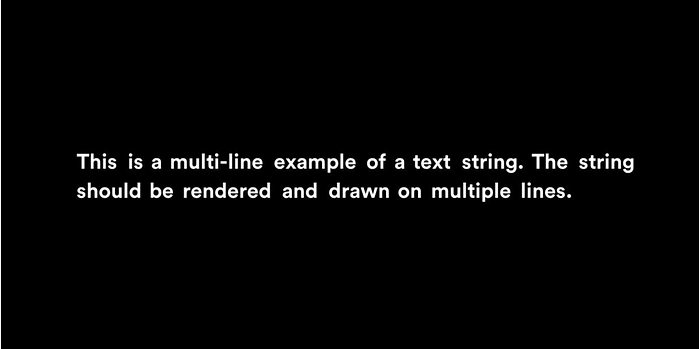
But what about the multi-line case? This was the whole problem I was trying to solve in the first place. We want to basically decide how many rows of text are going to be needed and then actually draw them.
Draw Multi-line Text String
In my case, I decided to split the string based on whitespace characters (you can obviously choose whatever splitting logic you desire). I wanted to iterate over the string, split it up into the individual words, determine if there was space on the existing row to include the word and then either draw it if so, otherwise create a new row and draw it there. Note- if you are not trying to center your text in the image then you do not need to actually determine how many total rows will be needed. You can skip straight to the actual drawing of the text.
// Determine how many rows are neededtotalRows := 1
lineWidth := 0
splitStrings := strings.Split(text, " ")for _, splitstr := range(splitStrings) {
    strWidth := font.MeasureString(face, splitstr).Ceil()
     if lineWidth + strWidth < IMAGE_WIDTH {
         // stay on existing row
         lineWidth += strWidth
     } else {
         // move to new row
         lineWidth = 0
         lineWidth += strWidth
         totalRows += 1
     }
}
The final value for totalRows is the number of rows your text string should be rendered into. Now we actually need to draw it.
for _, splitstr := range(splitStrings) {
    strWidth := font.MeasureString(face, splitstr).Ceil()
    if lineWidth + int(strWidth) < IMAGE_WIDTH {
        // stay on existing row        pt := freetype.Pt(lineWidth, (IMAGE_HEIGHT-(textHeight*totalRows))/2 + numRows*textHeight)
        lineWidth += strWidth
        _, err = c.DrawString(splitstr, pt)    } else {

        // new row
        lineWidth = 0
        numRows += 1
        pt := freetype.Pt(lineWidth, (IMAGE_HEIGHT-(textHeight*totalRows))/2 + numRows*textHeight)
        lineWidth += strWidth
        _, err = c.DrawString(splitstr, pt)    }
}
Great! At this point our image has the multiline text fully drawn!
Do whatever you want with the image created
At this point the image rgba is our full image. You can save it to a local file, upload it to GCS or a similar storage bucket. In my case I wanted to upload to GCS so simply get the byte stream of the image and upload that.
//Upload to GCSbuff := bytes.NewBuffer(nil)
err = jpeg.Encode(buff, rgba, nil)
bgBlob := buff.Bytes()ctx := context.Background()
client, err := storage.NewClient(ctx)
bucket := client.Bucket(<BUCKET_ID>)
wc := bucket.Object(<PATH_OF_FILE>).NewWriter(ctx)if _, err := io.Copy(wc, f); err != nil {
    return err
}
if err := wc.Close(); err != nil {
    return err
}
And that’s it! Happy future text rendering!